
Applications rely on the advantages of serverless technologies and message delivery is a critical part of that. In distributed applications reliable messaging plays a key role as this allow them to communicate with each other to improve their availability and scalability.
You must already know the two methods of messaging-
- Synchronous – Sender expects an immediate response from the receiver. You may know it as request-response way.
- Asynchronous – Sender does not expect a response. You may know it as pub-sub, batch processing etc.
Don’t worry! This post is not about distributed systems at all, it was just for the background. In this post, our focus is to concentrate on Asynchronous message delivery and we know two very famous services for that purpose- AWS SQS and AWS SNS.
This post is dedicated to AWS SNS , but if you want to go through AWS SQS as well, please read here.
What is AWS SNS?
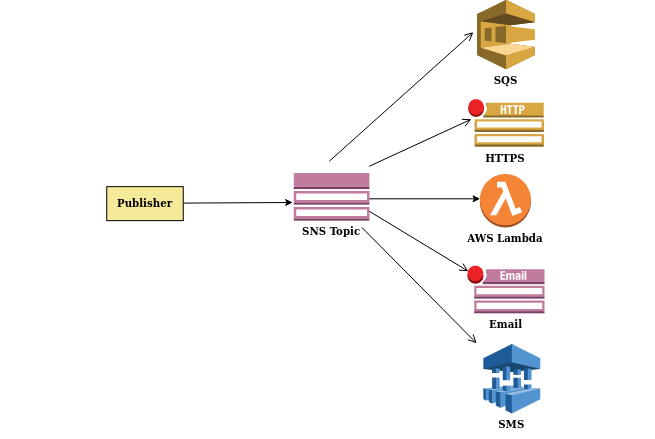
AWS SNS – Simple Notification Service is a cloud based service which delivers messages. – Its that simple!
It provides a push notification service which allow us to send messages to all the subscribers. Message is delivered to subscriber as soon as it is received from publisher. There can be any type of subscriber – AWS SQS, AWS Lambda, SMS etc.
Below diagram will clear out the picture-
Trigger Lambda using SNS
For this you need a AWS Free Tier Account. Click here to create one.
Firstly search for SNS in search bar and click on it. Click on ‘Next Step’ in the right and you should be able to see below screen-
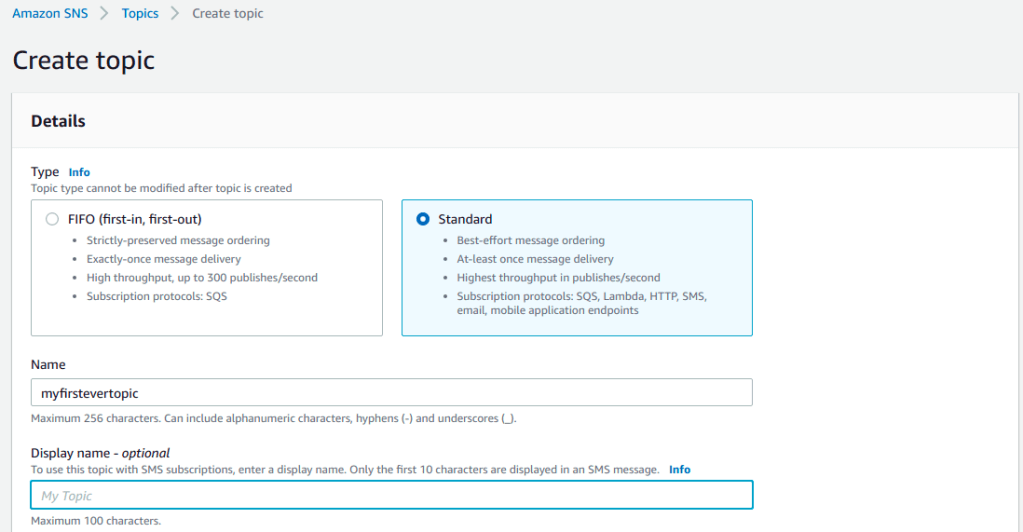
You may choose out of FIFO and Standard one as per your wish. Differences are clearly mentioned. I chose Standard one as order is not important for me.
After that, just mention the Topic name, scroll down a bit and click on Create Topic.
Now, the Topic is created, scroll down a bit and click on Create Subscription as below-
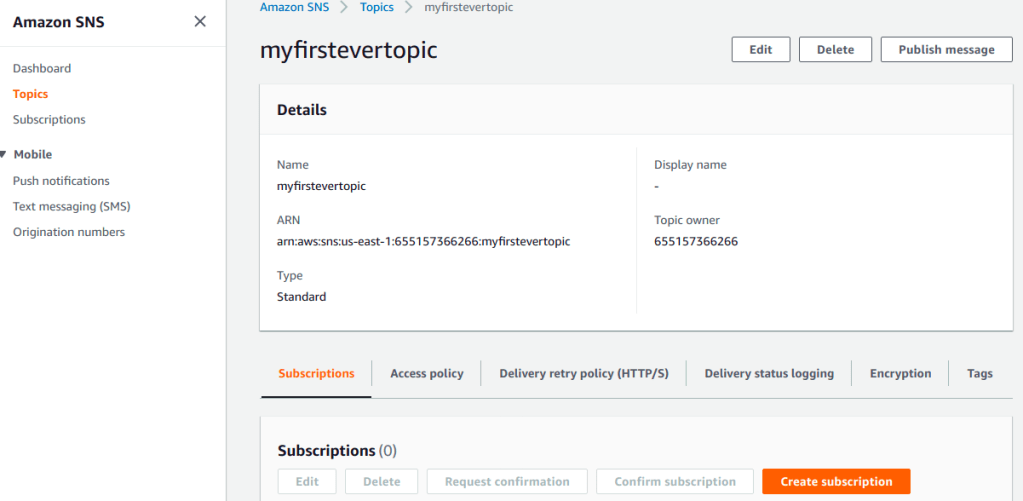
Now, choose the endpoint as AWS Lambda and enter the Lambda function arn, click on Create Subscription.

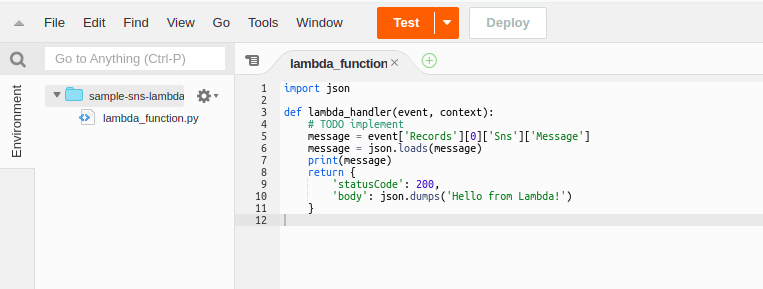
I forgot to mention, for above to work your lambda function should be ready. If not, you may quickly create a lambda function and add below code like me. Don’t forget to click on Deploy!
Now, let’s quickly test the whole process means when a message will be published to this topic, it will trigger our lambda function and process the message as per the code.
Click on Publish message in the top right-

Now, write the message in either plain text or you may send in JSON format also. Scroll down a bit and click on Publish message.

Now, quickly jump to CloudWatch logs and check logs for your lambda function. Above message must have triggered the lambda function and there must be a print statement visible in logs like below-

Yay! Our message published successfully.
For the simplicity we manually published the message to topic, this can be done by code also. You just need to write another lambda function and add the publish code to it. Here is a sample for that-
import json
sns_client = boto3.client('sns', region_name='us-east-1')

body = {"name": "glitchblog"}
message = json.dumps({"default": json.dumps(body,ensure_ascii= False)})
subject = 'First message'
response = sns_client.publish(
            TopicArn=topic_arn, #arn of SNS Topic
            Message=message,
            Subject=subject,
            MessageStructure='json',
        )['MessageId']
Conclusion
I hope now you have got clear about how to configure SNS with different subscribers and use them in your scenario. Let me know in comments!
Happy Learning 🙂

Nice piece of info, good work
LikeLiked by 1 person
Hope it helps
LikeLike